A-Frameは、Webベースの仮想現実(VR)および拡張現実(AR)体験を簡単に構築するためのオープンソースのフレームワークです。
今回は自分で独自のコンポーネントを作成して、プリミティブボックスなどの色を変えてみます。
A-Frameを読み込んだHTMLファイルを用意
htmlファイルを準備して、まずはA-Frameをインポートします。
<!DOCTYPE html>
<html lang="en">
<head>
    <meta charset="UTF-8">
    <meta name="viewport" content="width=device-width, initial-scale=1.0">
    <title>Document</title>
    <script src="https://aframe.io/releases/0.8.0/aframe.min.js"></script>

</head>
<body>
    <a-scene>

    </a-scene>
</body>
</html>
サーバーを起動します
http-server
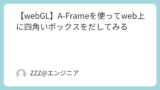
シーン中にプリミティブボックスを追加
a-sceneの中に、黄色の四角いボックスを追加します。
確認がしやすいように、Z軸-5の位置に置いて、背景はグリーンに設定しておきます。
<a-scene>
    <!-- グリーン背景 -->
    <a-sky color="green"></a-sky>

    <a-box
        position="0 0 -5"
        color="yellow"
    >
    </a-box>
</a-scene>
コンポーネントを追加
headタグの中にコンポーネントの記述を追加して、とりあえず「Hello, world!]を出力します。
<!DOCTYPE html>
<html lang="en">
<head>
    <meta charset="UTF-8">
    <meta name="viewport" content="width=device-width, initial-scale=1.0">
    <title>Document</title>
    <script src="https://aframe.io/releases/0.8.0/aframe.min.js"></script>

    <!-- これを追加 ↓↓↓ -->
    <script>
        AFRAME.registerComponent('hello-world', {
            init: function () {
                console.log('Hello, World!');
            }
        });
    </script>
     <!-- これを追加 ↑↑↑ -->
</head>
<body>
<a-scene>
    <!-- グリーン背景 -->
    <a-sky color="green"></a-sky>

    <a-box
        position="0 0 -5"
        color="yellow"
    >
    </a-box>


</a-scene>
</body>
</html>
a-boxタグにhello-worldを追加。
<a-box
    hello-world
    position="0 0 -5"
    color="yellow"
>
</a-box>
ブラウザのデバッグモードで確認すると、出力されたのが確認できます。
.png)
この記述でhello-worldというコンポーネントを定義しています。
a-boxなどのオブジェクトに追加することによって、実行せることができるようになります。
initはブラウザが開いた時に、一度だけ呼び出されます。
なのでこの場合、「Hello, World!」が一度だけ出力されます。
<script>
    AFRAME.registerComponent('hello-world', {
        init: function () {
            console.log('Hello, World!');
        }
    });
</script>
コンポーネントを使って、ボックスの色赤にする
コンソールをコメントアウトします。
setAttributeを使って、ボックスの色を変更してみます。
ここでいう「this.el」は、ボックス自体を指しています。
なので、ボックスの色を赤に変更するという記述になります。
<script>
    AFRAME.registerComponent('hello-world', {
        init: function () {
            // console.log('Hello, World!');

            this.el.setAttribute('color' , 'red')
        }
    });
</script>
赤に変更されているのが確認できます。
-1024x576.png)